First “Go” at Making a Coil Pot
I need a large pot beside the fireplace in my livingroom. So, I set out to make one.
What I wanted was far too large for me to throw on the wheel – even if I was to do it in sections. Coiling was the only way to go. The challenge was that I have never done a coil pot. I know the process but knowing is often very different than doing. I set out to see how I would fare.
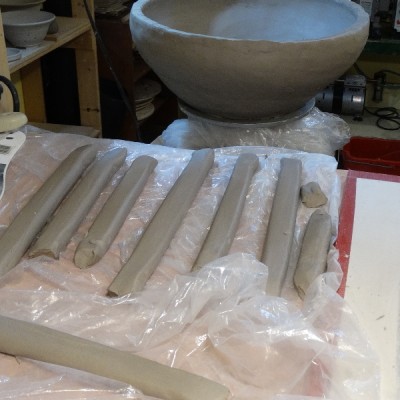
I began by creating a base for the pot and let it harden a bit before applying the first row of coils. I made up about 6 – 8 coils, set them on plastic and lightly covered them to prevent drying. Once the base was slightly firm but still very pliable, I placed my first row of coils and worked the base up the outside of the coil. I then placed a small coil inside at the base of the coil and carefully worked it in between the coil and the base.
I was able to lay down and join 4 – 5 rows before I needed to let the pot rest to avoid collapsing. I really worked the area between rows to be sure they were smooth and secure.
Constant checking of the shape is essential. It doesn’t take much for a pot to get lopsided! I didn’t have a template to work with – just an image in my head – so I just kept “eyeballing” it. Having the pot on a turntable is absolutely necessary. Each row was carefully evaluated to make sure of consistency of form.
I was able to get to about 30 cm (12″) the first day. Letting the pot rest and tighten up overnight under a loose covering of plastic before having another go the next day.
Making up a series of coils, working the pot, making up more coils, working the pot…, became a wonderful relaxing rhythm. Some great “oldie goldies” playing in the background for a sing along helped too!
As the pot reached the height I wanted, I started to think about the way I wanted to finish the rim. As I worked toward the centre, I played with a couple if different ideas in my head. The pot itself was very round and smooth. I was pleased that I had been able to accomplish this but… I love asymmetrical pieces with movement. So, making the rim uneven by adding coils to only one side and playing with the angle I “loosened” up the feel of the pot. Making some indentations in the pot and adding some texture gave more movement and interest to the pot. I added a couple of holes for future vines or a funky root or…? and DONE.
Well, done with the making. Drying is another matter. I had to enlist my husband’s help to move it to an out-of-the-way area to dry (too heavy for me to carry). Large pieces need to dry slowly and evenly to avoid cracking. I covered the pot loosely with plastic and took time each day to uncover it for a bit and then cover it again. I estimate a month of drying. It might not take that long but I want to be sure! Putting it in a bisque firing with moisture still in the clay could cause it to break.
I now have to turn my attention to glazing. I certainly can’t glaze this piece by dipping or pouring. For awhile now I have wanted to try my hand at spraying glaze so this is a great opportunity for me to try it out. We’ll see how that turns out! It might be a future blog.
I really enjoyed the coiling method – much more that I thought I would. I learned a lot from this first effort and will try my hand at making a few more pieces……much smaller….. to put in the gallery at Fenelon Falls and the Peterborough Potter’s Guild gallery this summer.
The photos below give an idea of the process of building a large coiled pot. Click on each picture for more detail.


