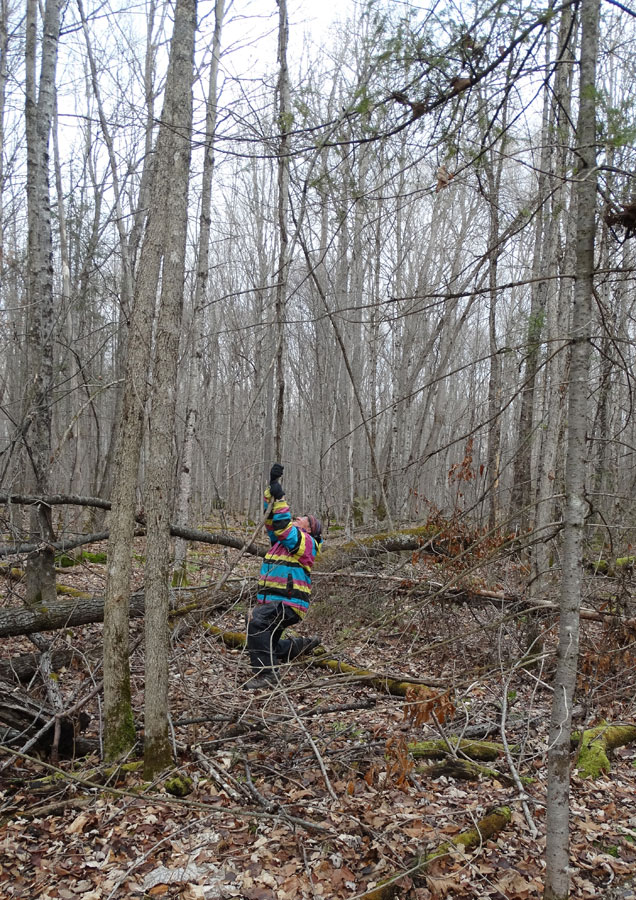
Earth & Vines
  • Home
  • Who we are
  • Galleries
    • Janet McDougall
    • Sandi McNeil
    • Other creative & Fun Stuff we do
  • News
  • Workshops
  • Exhibitions

Author Archive for Earth&Vines

The Process – Sandi McNeil

Posted by Earth&Vines on
September 3rd, 2021 |
0 Comments
Categories : basketry collecting materials Sandi McNeil

The fascinating thing about art is finding out the process of making the lovely things you see. Sandi McNeil shows us how she prepares the materials she uses from wood she finds.
Image #1 – July is the time of year for gathering and processing basswood bark. Four trees waiting to be peeled.
Image #2 – Trees after peeling them, tools used, waste tree/bark material and coiled basswood bark ready to use.
Image #3 – Cut and coiled. Basswood outer bark is grey in colour while basswood inner bark is blonde in colour. (Sandi says it will go grey if left outside)

  • basswood
  • trees after peeling them
  • cut and coiled
579 false false false

Artful Labels – Sandi McNeil

Posted by Earth&Vines on
May 5th, 2019 |
0 Comments
Categories : basketry How To labels Sandi McNeil
paper being prepared

paper being prepared

Labels are a necessary thing. Most items we buy come with some sort of a label, and art is no exception. Of course the price of the art is important, and that is often the first thing people look for when they look at the label. But in addition to the price, artists are often asked to include other information on their labels. Sometimes this can be confusing for the potential buyer. Other information usually refers to things such as; the artist’s name, an assigned code using artist initials, an inventory number, a title, dimensions, and materials or medium used to create each piece. Of course all that information needs to be presented in a neat, easily readable manner.

Ya right. No problem. The most common issue is distinguishing between the price and the inventory number, even though one starts with a $ symbol while the other starts with a # symbol.

Removable stickers are very helpful and allow for changes to codes and inventory numbers as art is shown at different venues.

The very first time I did a show, all my baskets had open faced labels with individualized information printed on each label. I was very proud of all the work I had accomplished, including
each label tied to each basket. During that day it rained, only very briefly, but long enough to get the labels wet. All the ink ran and the print became unreadable. I was so disappointed. I knew I had to replace all my labels with something that would provide some resistance to rain.

the cutting process

the cutting process

So back to the drawing board….What if I made folded covers for my labels out of fake parchment paper? The parchment paper would keep the information on the inside dry, and it could withstand a bit of rain without being ruined. Inside the folded covers, I could attach my business card, and include another folded paper insert that had all the information that is usually requested. Finally, each label could attached to the art using recycled telephone wire. So that’s what I did and it works!

When I make the parchment paper, I like to include dried silver dollars and the seeds from the silver dollar plant. I make the paper in the summer when it is warm enough to work on large tables in the garage. I use a lot of white glue in the process, and summer temperatures allow it to dry in a few days. After the glue has dried, the parchment paper needs another warm day to soften it before cutting it into size and then folding it in half. I use a large paper cutter to cut the parchment paper and paper inserts.

It takes me a lot of time to create the labels for my art, but some people tell me that they like the label so much, and they want to keep the information it contains, so they leave the label attached to their basket. That makes all the work worthwhile for me!

Yes, labels are a lot of work but labels are a necessary thing.

finished product

finished product

Glazing – Janet McDougall

Posted by Earth&Vines on
June 5th, 2018 |
0 Comments
Categories : glazing Janet McDougall pottery

Janet McDougall is getting ready to glaze some wonderful new pieces…. and trying out some new glaze recipes. You’ll see the wonderful results at this year’s Victoria County Studio Tour.

598 false false false

Vines

Posted by Earth&Vines on
May 29th, 2016 |
0 Comments
Categories : basketry Sandi McNeil

Winter Rhythms:

Vines

I start with gathering vines. Gathering vine is always an adventure because sometimes the vine doesn’t want to let go of the tree. This is when it’s helpful to bring a strong friend.  In fact there have been times when we have pulled down the tree in the process of pulling on the vine.  In extreme cases for exceptionally large vines, a truck with 4 wheel drive and a long cable is necessary.  Another extreme method is to chainsaw the tree down, carefully remove the vine, and then cut up the tree for fire wood.  Once I have the vine at home I trim off any dead growth, or vine that is too thin to use. I spread the vines out on the ground and take notice of the kinds of shapes that are in the vines. Some would say that I let the vines speak to me. Often I will work from big to small when choosing which vine to work with.  As I decide the shape of the basket frames, I tie the frames together as I go. If some vine is particularly wonky, I put the basket frame under something heavy to flatten it out and make it more symmetrical. I typically leave the frame for several weeks (or more) to dry out somewhat before I weave on it. I continue to work on vines for several days, until all the gathered vines have been used to form frames for different kinds of baskets.  I stack the frames in the garage to dry out until I’m ready for the next steps.

447 false false false


Spring Willow

Posted by Earth&Vines on
May 15th, 2016 |
0 Comments
Categories : Uncategorised

Spring Willow Struts Its Stuff

As spring approaches and the sun grows stronger, the lowly ditch willow starts to transform. It really is an amazing plant!  All summer it is an unremarkable green shrub, found in our wet ditches, and recognized by few.  After the leaves fall off and winter progresses, Willow starts to strut its stuff!  It starts to change its colour.  The growing tips become deep reds and burgundies, and further down the stems it’s not unusual to see yellows and oranges and bright green. There are almost 400 different kinds of willows, representing an impressive range of early spring colours!  Spring gathering of colourful Willow on a nice sunny day is rewarding unto itself.  Not only is each rod colourful, it is also a very flexible, yet strong plant material ideally suited to basket making.


The other amazing thing that sets Willow apart from other common shrubs is the ability in spring to sport fuzzy little flower buds often referred to as pussy willows or catkins. These pussy willows are one of the earliest signs of spring. It has always been a spring ritual for me to go outside and clip the first pussy willows of the new season. Now when I see pussy willows, I know that my time to use fresh Willow in baskets is limited. In fact there have been times that pussy willows have sprouted, after I have woven the Willow rod into a basket.

The arrival of pussy willows signals the end of my focus on making winter baskets. It means it is time for me to stop making ribbed baskets, and to start thinking about the huge job of gathering enough spring bark to last me for the next year.

pussy willows

Coil Pots

Posted by Earth&Vines on
May 1st, 2016 |
0 Comments
Categories : How To Janet McDougall pottery

First “Go” at Making a Coil Pot

I need a large pot beside the fireplace in my livingroom.   So, I set out to make one.

What I wanted was far too large for me to throw on the wheel – even if I was to do it in sections.  Coiling was the only way to go.  The challenge was that I have never done a coil pot. I know the process but knowing is often very different than doing.  I set out to see how I would fare.

I began by creating a base for the pot and let it harden a bit before applying the first row of coils.  I made up about 6 – 8 coils, set them on plastic and lightly covered them to prevent drying.  Once the base was slightly firm but still very pliable, I placed my first row of coils and worked the base up the outside of the coil. I then placed a small coil inside at the base of the coil and carefully worked it in between the coil and the base.

I was able to lay down and join 4 – 5 rows before I needed to let the pot rest to avoid collapsing.  I really worked the area between rows to be sure they were smooth and secure.

Constant checking of the shape is essential.  It doesn’t take much for a pot to get lopsided!  I didn’t have a template to work with – just an image in my head – so I just kept “eyeballing” it.  Having the pot on a turntable is absolutely necessary.  Each row was carefully evaluated to make sure of consistency of form.

I was able to get to about 30 cm (12″) the first day.  Letting the pot rest and tighten up overnight under a loose covering of plastic before having another go the next day.

Making up a series of coils, working the pot, making up more coils, working the pot…, became a wonderful relaxing rhythm.  Some great “oldie goldies” playing in the background for a sing along helped too!

As the pot reached the height I wanted, I started to think about the way I wanted to finish the rim.  As I worked toward the centre, I played with a couple if different ideas in my head.  The pot itself was very round and smooth.  I was pleased that I had been able to accomplish this but…  I love asymmetrical pieces with movement.  So, making the rim uneven by adding coils to only one side and playing with the angle I “loosened” up the feel of the pot.  Making some indentations in the pot and adding some texture gave more movement and interest to the pot.  I added a couple of holes for future vines or a funky root or…? and DONE.

Well, done with the making.  Drying is another matter.  I had to enlist my husband’s help to move it to an out-of-the-way area to dry (too heavy for me to carry).  Large pieces need to dry slowly and evenly to avoid cracking.  I covered the pot loosely with plastic and took time each day to uncover it for a bit and then cover it again.  I estimate a month of drying.  It might not take that long but I want to be sure!  Putting it in a bisque firing with moisture still in the clay could cause it to break.

I now have to turn my attention to glazing.  I certainly can’t glaze this piece by dipping or pouring.  For awhile now I have wanted to try my hand at spraying glaze so this is a great opportunity for me to try it out.  We’ll see how that turns out! It might be a future blog.

I really enjoyed the coiling method – much more that I thought I would.  I learned a lot from this first effort and will try my hand at making a few more pieces……much smaller…..  to put in the gallery at Fenelon Falls and the Peterborough Potter’s Guild gallery this summer.

The photos below give an idea of the process of building a large coiled pot.  Click on each picture for more detail.

417 false false false

Winter Rhythms

Posted by Earth&Vines on
April 18th, 2016 |
0 Comments
Categories : basketry How To Sandi McNeil
Sandi gathering grapevine for basket frames

Sandi gathering grapevine for basket frames

Winter Rhythms

When winter arrives and most people start to hibernate, I go into high gear basket making!  I create my own rhythms for winter which is unlike any other season.  My time is split between the  different steps for basket making, and outdoor fun with my two Siberian huskies.

During spring, summer and fall there is a different rhythm. I gather and process different kinds of bark, cut and dry local plant life, harvest plants from my gardens, make yards and yards of different kinds cordage, and patiently wait for winter to begin. I love winter.

Once winter begins and the leaves are off, vines are easier to pull out of the trees and I don’t have to spend time removing the leaves. When the frost hits the dogwood and willow, their leaves also fall off, and the colour of the willow does not change after being cut. Dogwood likes the frost and becomes a brighter red making its location easy to find. The temperature drops and my huskies get frisky. It’s time to think about balancing assembling baskets and dogsledding.  I love winter!

369 false false false

Earth and Vine Series

Posted by Earth&Vines on
April 11th, 2016 |
0 Comments
Categories : basketry How To Janet McDougall pottery Sandi McNeil

Earth and Vine Series

It is always exciting to try something new…….. I often have too many projects going on at once.  Sandi and I have collaborated in the past on a number of projects such as our Twig and Tile tables and some garden installations.  We have chatted about trying to incorporate grapevine, bittersweet vine or cedar into my pottery but until this year it has just been talk.  So we decided to get busy.

I started with making some pots trying to keeping in mind where I thought the vine or root would be attached. I wanted to have a variety of shapes and sizes of pots to play with so we could see what we thought worked best once they were completed – just in case we wanted to do more!  With this in mind, I threw some open bowls and vases and also did some hand-building, both slab and coil work. At the leather-hard stage, I added some holes for lashing on various vines. Once my pots were bisque fired, I selected some glazes that I thought would complement the natural materials to be attached.  After glazing and firing, we were ready to start.

Sandi raided her studio for vine, cordage she had made, cedar bark and some great twisty roots she had collected. We were ready to have some fun creating.  It was a learning process for both of us.  Below are some pictures that give some idea about the process and the final product. Click on the images for more detail.  Some larger pieces are in process now and I am excited to see how they turn out.

396 false false false

Magic at Nichol’s Cove

Posted by Earth&Vines on
January 12th, 2016 |
0 Comments
Categories : news

A recent article  in the Peterborough Examiner highlights beautiful Nichol’s Cove Studio and the work by Carol Nichol, Janet McDougall and Sandi McNeil .

Click here for the article.

Nichol's Cove Studio

Interview with Sandi McNeil

Posted by Earth&Vines on
November 18th, 2015 |
0 Comments
Categories : Courses Sandi McNeil

Braided cat tails, cherry red dog wood & woven tree bark – these are the materials used to weave baskets with Sandi McNeil of Earth and Vine.

Sandi leads workshops on basket weaving and wire tree sculpture making at a cozy studio space tucked away in the natural setting that is Kawartha Lakes. In the winter, warm cookies are served from atop the wooden stove that heats the studio. During the warmer months, when weather permits, workshops are held outside. Sandi encourages workshop participants to gather inspiration (and materials) from nature and there is no better place than Kawartha Lakes to do so.

Posted with permission by Kawarthas Northumberland on Wednesday, November 18, 2015

A new video was just released by Kawarthas Northumberland featuring Sandi McNeil.

Take a look here.

Next Page »

Follow Us:

  • Facebook

Join our Mailing List

* indicates required

View previous campaigns.

Earth and Vine
Copyright © 2023 All Rights Reserved

Designed by m. sullivan